As a homeowner, I’ve always enjoyed tackling DIY projects around the house. It’s not just about saving money; it’s the sense of accomplishment that comes with successfully completing home improvement tasks. Faucet installation is one such project that, with the right guidance and a bit of confidence, can be a rewarding endeavor.
I’ll share a step-by-step guide to faucet installation, complete with professional tips and tricks that I’ve picked up along the way based from Plumbing Addison TX.
Why Install a Faucet Yourself?
Before we dive into the steps, let’s address why you might consider installing a faucet yourself. There are several good reasons:
- Cost Savings: Hiring a plumber for faucet installation can be expensive. Doing it yourself can save you a significant amount of money.
- Customization: DIY installation allows you to choose the faucet you love and customize your kitchen or bathroom to your taste.
- Learning Experience: Engaging in DIY projects is a valuable learning experience. You acquire new skills and knowledge that can be applied to future projects.
- Satisfaction: There’s a sense of pride that comes with completing a home improvement task on your own. It’s gratifying to see and use something you’ve installed.
Tools and Materials You’ll Need
Before you start, gather the necessary tools and materials. Having everything at hand will make the installation process smoother. Here’s what you’ll need:
Tools:
- Adjustable wrench
- Plumber’s tape (Teflon tape)
- Plumber’s putty (optional)
- Basin wrench (optional, for hard-to-reach places)
- Bucket or towels (for any water spillage)
- Screwdrivers (Phillips and flathead)
- Pipe cutter (if replacing water supply lines)
- Hacksaw (if cutting pipes)
- Adjustable pliers
- Tape measure
Materials:
- New faucet
- Faucet supply lines (if not included with the faucet)
- Plumber’s tape
- Plumber’s putty (if required)
- Pipe connectors (if connecting to existing pipes)
- Safety glasses
Now that you’ve gathered your tools and materials, let’s proceed with the step-by-step faucet installation process.
Step 1: Turn Off the Water Supply
Safety is a top priority in any DIY project. To begin, locate and turn off the water supply to the faucet you’ll be working on. This typically involves shutting off the water valves under the sink. Turn the valves clockwise until they’re fully closed.
Step 2: Disconnect the Old Faucet
If you’re replacing an existing faucet, you’ll need to disconnect it first. Use your adjustable wrench to remove the supply lines that connect the faucet to the water supply. Place a bucket or towels under the connections to catch any residual water.
Next, remove the old faucet. This may involve loosening and removing mounting nuts or screws. Be patient and gentle to avoid damaging the sink or countertop.
Step 3: Clean the Installation Area
Once the old faucet is removed, take the time to clean the installation area thoroughly. Scrape away any old putty or debris and make sure the surface is clean and dry. If necessary, use a putty knife to remove stubborn residue.
Step 4: Assemble the New Faucet
Before installing the new faucet, follow the manufacturer’s instructions to assemble it. This typically involves attaching handles, spouts, and other components. Be sure to use the provided washers and nuts to secure everything properly.
Step 5: Apply Plumber’s Tape
Wrap plumber’s tape (Teflon tape) around the threads of the faucet’s tailpieces. This tape helps create a watertight seal and prevents leaks. Wrap the tape clockwise around the threads, overlapping it as you go.
Step 6: Install the Faucet
Position the new faucet into the mounting holes on the sink or countertop. If you’re installing a kitchen faucet, you may need to attach the sprayer hose or pull-down hose as well. Check the manufacturer’s instructions for specific guidance.
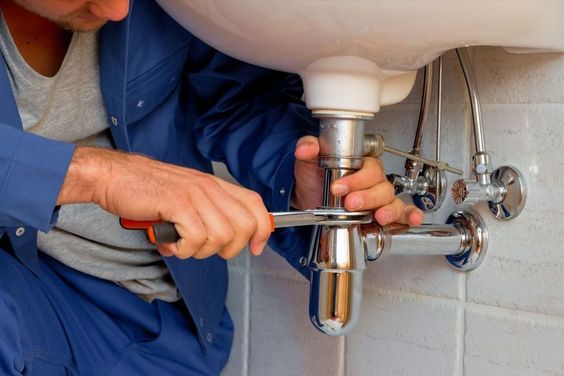
Step 7: Secure the Faucet
Once the faucet is in place, secure it by tightening the mounting nuts or screws from beneath the sink. Use an adjustable wrench or basin wrench if needed. Ensure that the faucet is level and centered before tightening completely.
Step 8: Connect the Supply Lines
Connect the faucet’s supply lines to the hot and cold water supply valves. If the faucet came with its own supply lines, attach those. Otherwise, you may need to use pipe connectors to connect to the existing pipes.
Use an adjustable wrench to tighten the connections. Be careful not to overtighten, as this can damage the connections and lead to leaks.
Step 9: Turn On the Water Supply
With the faucet securely installed and the supply lines connected, turn on the water supply by opening the valves under the sink. Check for any leaks around the connections. If you see any drips, turn off the water supply, double-check the connections, and tighten as needed.
Step 10: Test the Faucet
Turn on the faucet to test both the hot and cold water. Check for any unusual noises, low water pressure, or leaks. Make sure the handles operate smoothly. If everything checks out, you’ve successfully installed your new faucet.
Additional Tips and Tricks for Faucet Installation:
- Use Plumber’s Putty: When installing faucets with gaskets, you can apply plumber’s putty under the faucet’s base to create a better seal. This is particularly useful for ceramic or non-porous sinks.
- Positioning the Handles: When installing a faucet with separate hot and cold handles, make sure they are correctly positioned. The handle on the right should control hot water, while the left should control cold.
- Tighten Gradually: When securing the faucet with nuts or screws, tighten them gradually and evenly. This ensures that the faucet sits level and doesn’t wobble.
- Choose the Right Faucet: Before purchasing a new faucet, measure the number of mounting holes in your sink or countertop. Ensure that the new faucet matches the hole configuration to avoid unnecessary modifications.
- Consider Water Efficiency: If you’re environmentally conscious, choose a faucet that is WaterSense certified to conserve water without sacrificing performance.
- Safety First: Always wear safety glasses when working under the sink to protect your eyes from debris and water.
In conclusion, based from Plumbing Addison TX, faucet installation can be a satisfying DIY project that not only saves money but also allows you to customize your kitchen or bathroom. By following this step-by-step guide and incorporating professional tips and tricks, you can successfully install a new faucet and enjoy the benefits of your handiwork. Remember to prioritize safety, take your time, and don’t hesitate to seek professional help if you encounter any challenges beyond your skill level. Happy faucet installation!
Addison’s Best Plumbing & Hydro Jetting
4900 Airport Pkwy #1884, Addison, TX 75001, United States
469-703-8531